Contouring and highlighting are transformative makeup techniques that sculpt, define, and enhance your natural facial structure. When done correctly, they can create the illusion of higher cheekbones, a slimmer nose, a sharper jawline, and a radiant glow that looks effortless rather than obvious. While professional makeup artists make it appear easy, mastering contour and highlight is a skill that anyone can learn with the right guidance.
In this guide, you will learn everything you need to know about contouring and highlighting like a professional—from understanding face shapes and product selection to step-by-step application techniques, blending secrets, common mistakes, and pro tips.
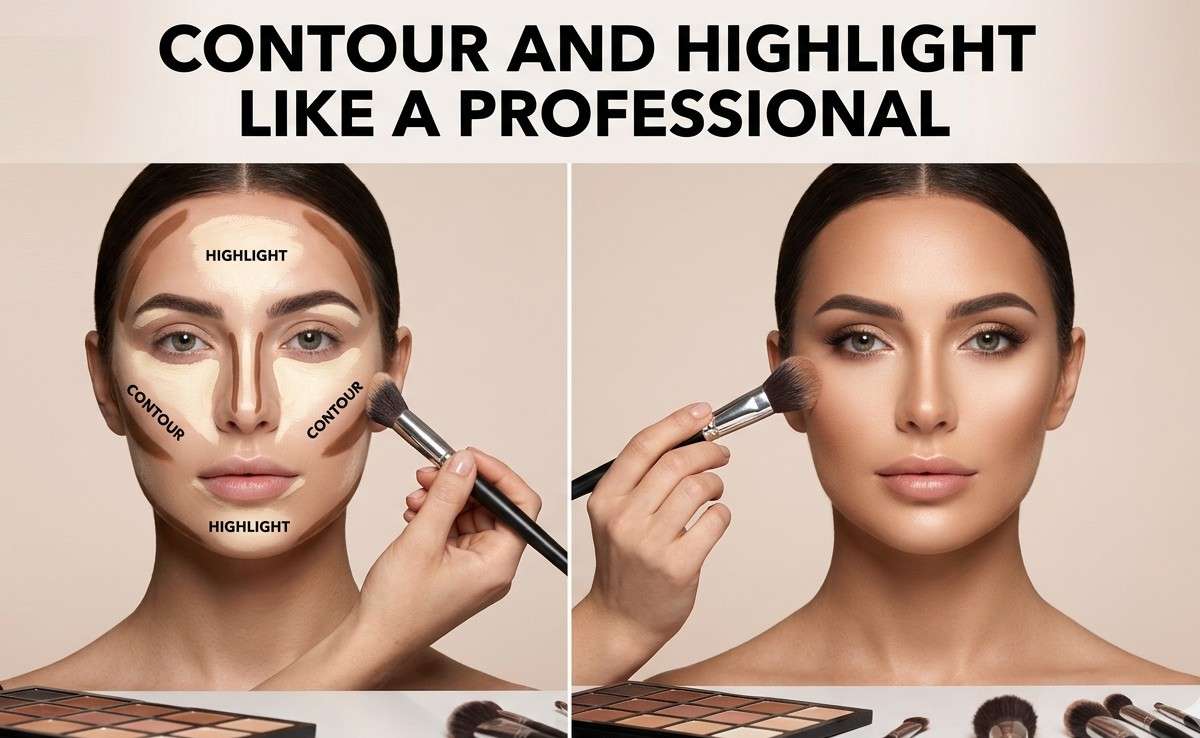
What Is Contouring and Highlighting?
Contouring and highlighting work together to enhance facial structure using light and shadow.
- Contouring uses a matte product that is slightly darker than your skin tone to create shadows. These shadows make certain areas recede, giving definition and structure.
- Highlighting uses a lighter or luminous product to bring features forward, enhancing high points of the face.
Together, these techniques mimic the way natural light interacts with the face, creating dimension in what would otherwise appear flat under foundation.
Understanding Face Shapes Before You Begin
Professional-level contouring begins with identifying your face shape. Each shape requires a slightly different placement strategy.
Oval Face
Balanced proportions with slightly wider cheekbones. Most contour placements work well here. Light sculpting under cheekbones and slight jawline definition are usually sufficient.
Round Face
Full cheeks with softer angles. Focus contour on the sides of the forehead, under cheekbones, and along the jawline to add definition and elongate the face.
Square Face
Strong jawline and forehead width similar to jaw width. Soften angles by contouring the corners of the forehead and jaw.
Heart-Shaped Face
Wider forehead and narrow chin. Contour the temples and lightly under cheekbones. Avoid heavy chin contouring.
Long or Rectangular Face
Longer vertical proportions. Focus on contouring the top of the forehead and chin to visually shorten the face.
Understanding your face shape ensures your contour placement enhances rather than distorts your natural structure.
Choosing the Right Contour and Highlight Products
Professional results depend heavily on selecting the right formulas and shades.
Cream vs. Powder Contour
Cream Contour
- Best for dry or normal skin
- Blends seamlessly into liquid foundation
- Offers a natural, skin-like finish
Powder Contour
- Ideal for oily or combination skin
- Easier for beginners
- Provides a more matte, structured look
Contour Shade Selection
- Choose a shade 1–2 tones darker than your foundation.
- Opt for neutral or cool undertones to mimic natural shadows.
- Avoid overly warm or orange tones unless bronzing.
Highlight Options
Matte Highlight
- 1–2 shades lighter than your foundation
- Used to brighten under eyes and center of face
Shimmer Highlight
- Adds glow and luminosity
- Applied to high points of the face
Professional tip: Avoid chunky glitter. Choose finely milled highlighters for a seamless glow.
Tools You Need for Professional Results
Using the correct tools dramatically improves blending and precision.
Brushes
- Angled contour brush for cheekbones
- Small precision brush for nose contour
- Fluffy blending brush for diffusing edges
- Fan or tapered brush for powder highlight
Sponges
- Damp makeup sponge for blending cream contour
- Ideal for seamless, skin-like finishes
Other Tools
- Makeup mirror with natural lighting
- Clean hands for warmth blending
Professional makeup artists always emphasize blending as the key to flawless contour.
Step-by-Step: How to Contour Like a Professional
Step 1: Prep Your Skin
Start with moisturized skin and apply primer. Follow with foundation and concealer before contouring. Contour works best on an even base.
Step 2: Map Your Face
Before blending, lightly map out contour areas:
- Under cheekbones
- Along hairline
- Along jawline
- Sides of nose
- Under bottom lip (optional)
- Sides of forehead (if needed)
Step 3: Cheekbone Contour
Locate your cheekbones by feeling beneath them. Apply contour slightly above the hollow, not directly inside it, for a lifted effect.
Blend upward, never downward. Downward blending drags the face.
Step 4: Forehead Contour
Apply along the hairline to reduce width or height if desired. Blend into the hairline seamlessly.
Step 5: Jawline Contour
Apply directly under the jawline to create separation between face and neck. Blend downward into the neck for natural definition.
Step 6: Nose Contour
Use a small brush to apply two thin lines along the sides of the nose. Connect under the tip if shortening is desired.
Blend carefully to avoid harsh stripes.
Step 7: Lip Contour (Optional)
Apply a small amount under the lower lip to create the illusion of fullness.
Step-by-Step: How to Highlight Like a Professional
Step 1: Under-Eye Brightening
Apply a lighter concealer in a triangular shape under the eyes. Blend upward toward temples for lift.
Step 2: Center of Forehead
Apply a small amount to the center to bring balance and light.
Step 3: Bridge of Nose
Add a thin line down the bridge. Avoid extending to the tip if you want to avoid lengthening the nose.
Step 4: Cupid’s Bow
Highlight above the lip for enhanced definition.
Step 5: Chin
Apply lightly to the center for balance.
Step 6: Cheekbone Glow
Apply shimmer highlight on the highest point of the cheekbones. Blend into blush for seamless glow.
Professional tip: Highlight should reflect light subtly. It should not appear as a visible stripe.
Blending Techniques That Make All the Difference
Blending transforms contour from obvious stripes into natural shadow.
- Use tapping motions instead of dragging.
- Blend cream products before setting with powder.
- Diffuse edges with a clean brush.
- Check your makeup in different lighting.
If you see clear lines, continue blending.
Setting Your Contour and Highlight
To lock in your work:
- Set cream contour with a matching powder contour.
- Lightly set highlight areas with translucent powder.
- Finish with setting spray to melt layers together.
Setting spray removes powdery texture and enhances skin-like finish.
Contour and Highlight for Different Occasions
Everyday Makeup
Use light contour and subtle matte highlight. Focus on soft blending.
Glam or Event Makeup
Layer cream and powder contour. Add luminous highlight on cheekbones and collarbones.
Photography Makeup
Slightly intensify contour to prevent flash washout.
Common Contouring Mistakes to Avoid
- Using too dark a contour shade
- Choosing warm bronzer instead of true contour
- Placing contour too low on cheeks
- Skipping blending
- Applying too much shimmer highlight
- Ignoring neck blending
Professional makeup artists focus on restraint and balance.
Advanced Professional Techniques
Reverse Contouring
Apply highlight first and contour after foundation for softer sculpting.
Draping
Use blush as contour for a lifted, editorial look.
Cream-to-Powder Layering
Layer products for long-lasting definition.
Baking
Apply loose powder under contour to sharpen edges.
Contouring for Different Skin Types
Oily Skin
Use powder contour and oil-controlling primer.
Dry Skin
Use cream contour and hydrating setting spray.
Mature Skin
Avoid heavy shimmer. Focus on soft, lifted placement.
How to Practice and Improve?
- Take photos in natural light.
- Study professional makeup artists’ techniques.
- Practice blending on clean skin.
- Experiment with placement variations.
Skill develops through repetition and observation.
Final Thoughts
Contouring and highlighting are about enhancing—not altering—your natural beauty. Professional-level results come from understanding light and shadow, choosing the correct shades, blending thoroughly, and practicing consistently.
Remember that subtlety often looks more sophisticated than dramatic sculpting. The goal is to create dimension that looks effortless and refined. Mastering contour and highlight takes time, but once you understand placement and blending, it becomes one of the most powerful techniques in your makeup routine.
FAQ’s
Is contouring necessary for everyday makeup?
No. Contouring is optional. A light bronzer and subtle highlight are enough for daily wear.
Can beginners use cream contour?
Yes, but powder may be easier to control initially.
How do I know if my contour is blended enough?
If you cannot see where it starts or ends, it is properly blended.
Should contour go above or below cheekbones?
Slightly above the hollow creates a lifted look.
Can I contour without foundation?
Yes. Use light cream contour blended directly onto skin.
Is highlighter suitable for oily skin?
Yes, but use minimal product and avoid oily formulas.
What is the difference between bronzer and contour?
Bronzer adds warmth. Contour adds shadow and structure.
Can I contour a round face?
Yes. Focus on outer face areas to elongate.
What is the correct order: contour or highlight first?
Apply contour after foundation and before powder. Highlight usually comes after contour, but both should be blended before setting.
What is the difference between cream and powder contour?
Cream contour provides a softer, skin-like finish and works well for dry skin. Powder contour is easier to control and ideal for oily or combination skin.
Where exactly should I place contour on my cheeks?
Apply contour slightly above the natural hollow of your cheekbone for a lifted effect. Blend upward toward the temples.
How can I make my nose look slimmer with contour?
Draw two thin lines along the sides of the nose and blend inward. Keep the lines close together for a slimmer illusion.
Is highlighter necessary for everyday makeup?
No, it is optional. A subtle matte highlight or brightening concealer is enough for daily wear.
Why does my contour look muddy?
This usually happens when the shade is too warm or too dark. Improper blending can also cause a muddy appearance.
Can mature skin use contour and highlight?
Yes, but use soft, matte formulas and avoid heavy shimmer. Focus on lifting techniques rather than sharp lines.
How do I prevent harsh contour lines?
Use light layers and blend with tapping motions. A clean brush can help soften edges.
Should I contour my jawline?
Yes, applying contour under the jawline can create definition. Blend downward into the neck for a seamless finish.
What type of brush is best for contouring?
An angled contour brush works well for cheekbones. A small precision brush is best for nose contouring.
Can I use bronzer instead of contour?
Bronzer adds warmth, while contour creates shadow. They are not the same, but bronzer can provide light definition if used carefully.
Does contouring make your face look thinner?
Yes, when placed strategically, contour can create the illusion of a slimmer and more sculpted face.
How do professionals make contour look natural?
They use minimal product, build gradually, and blend thoroughly. Proper shade selection is also essential.
Should I set cream contour with powder?
Yes, setting with a matching powder contour increases longevity and prevents creasing.
How long does contour and highlight last?
With proper priming and setting spray, contour and highlight can last 6–10 hours depending on skin type and climate.
Also Read: