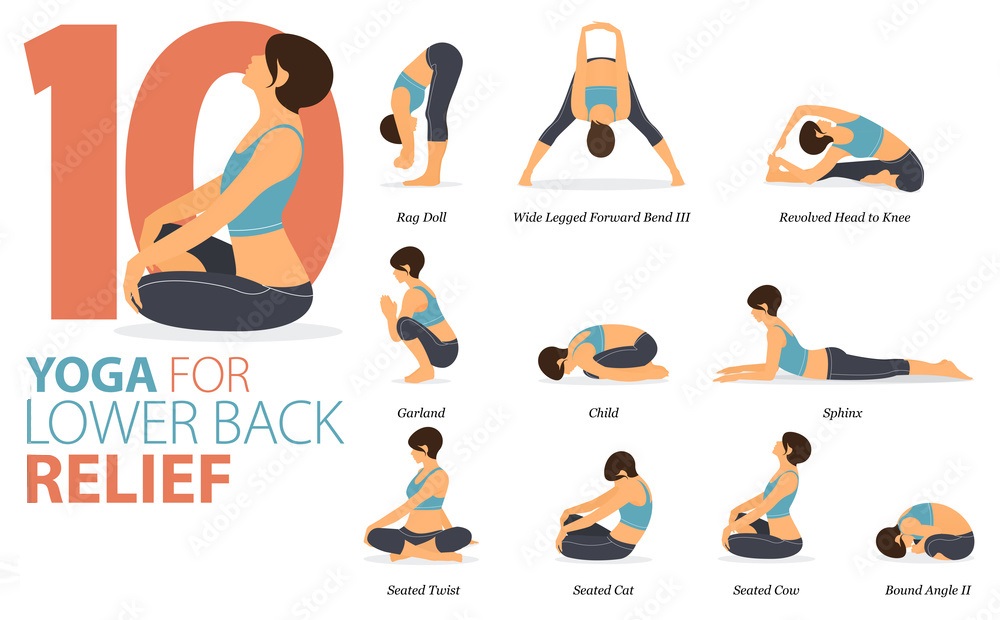
Our life is very sedentary now, especially after the pandemic. Zoom meetings lasting several hours and typing out those thousands of emails. It has become difficult to manage the household chores, we hardly have time to take care of our body. No wonder sciatica pain has become a huge problem. Every other person complains of a backache, so what exactly do we do? Well, like other health problems, you too can take advantage of the power of yoga poses for back pain, spine and sciatica.
Yoga Asanas for Back Pain, Spine and Sciatica
The yoga asana/poses which will be described here are mainly useful for curing all diseases related to back pain, cervical spondylitis, slip disc, sciatica etc.
1) Chakrasana (Upward Bow Pose)
Chakra means wheel, after doing this asana, the shape of the body looks like a wheel, hence this asana is called Chakrasana. Being the opposite of Dhanurasana, it is also called Urdhva Dhanurasana. In Yoga Shastra this asana is called Manipurak Chakra.
Process of Chakrasana :
- Lie on your back and bend your knees. The heels should be close to the buttocks.
- Keep both the hands upside down and place them behind the shoulders at a slight gap, this maintains balance.
- By inhaling, lift the katipradesh and chest up.
- Slowly try to bring the hands and feet closer, so that the shape of the body becomes like a circle.
- While coming back from the posture, loosening the body and resting the waist on the ground. Do 3 to 4 repetitions like this.

Benefits of Chakrasana :
- By making the spine flexible, it does not allow old age to come. Activates the stomach and intestines.
- Increases energy, strength and agility in the body.
- It is especially beneficial in sciatica, respiratory disease, headache, eye disorders and cervical spondylitis.
- Makes the muscles of the hands and feet strong.
- Removes disorders of the uterus of women.
2) Markatasan (Monkey Pose Twist)
Markat posture is a very easy and beneficial posture, this asana can be done by all classes of people. There are many benefits of doing Merkat posture. We also know Markat posture by another name, as to know any word, first of all knowing the root word of that word, knowing the meaning of the root word, we get to know half of the information like this. In the same way, you will learn about the Merkat posture. Markat means ‘monkey’ and this posture is also called monkey posture. While doing this asana, the shape of the body becomes like a monkey, hence this posture is also called monkey posture.
Process of Markatasan :
- Lie down straight and spread both the hands parallel to the shoulders, palms should be open towards the sky; Then bend both the legs from the knees and bring them near the buttocks. Now while bending the knees to the right, keep both the knees and ankles together on the ground, keeping the neck bent to the left; Fold it to the left like this; Similarly, do this asana from the left side also, it is called ‘Marktasana’.

Markatasan – 2
Process :
- Lying on the back, bend both the legs from the knees and keep them near the buttocks, keep a gap of about one and a half feet in the feet (both hands should be spread in the line of the shoulders with the palms facing upwards). Now bend the right knee to the right and rest it on the ground, bend the left knee so that it touches the toes of the right foot, keep the neck bent to the left i.e. in the opposite direction. Do the same way with the other leg. It is called ‘Marktasana-2’.
Markatasan – 3
Process :
- Lying straight, spread both the hands parallel to the shoulders, palms open towards the sky, lift the right leg 90 degrees (900) and slowly take it to the left hand, keep the neck bent to the right, stay in this position for some time. After that, lift the leg straight at 90 degrees (900) and slowly rest it on the ground. Similarly do this action with the left leg.
- In the end, raise both the legs together at 90 degrees (900) and keep them near the left hand, bend the neck in the opposite direction and look to the right, after some time straighten the legs as before. Similarly, lift both the legs and keep them near the right hand. Turning the neck to the left and look to the left, this is one repetition. This whole process is called ‘Marktasana-3’. Do 3 to 4 repetitions like this.
Caution :
Those who have more pain in the back, do not do it with both the legs simultaneously. They should do 2-3 repetitions with each leg.
Benefits of Markatasan :
- Makes the stomach light by removing stomach-ache, diarrhea, constipation and gas. It is especially beneficial in the pain of buttocks and joints.
- It is a particularly beneficial asana in back pain, cervical spondylitis, slip disc and sciatica.
3) Kati-Uttanasana (Standing Spinal Twist Pose)
Process of kati-uttanasana :
- Lie down in a shavasana and keep both the legs folded. Keep both the hands spread in the side on both the sides.
- A while inhaling, pull the back upwards. The buttocks and shoulders should be resting on the ground. Then while exhaling, press the back down on the ground and straighten it completely. In this way do this exercise for 8 to 10 times.
Benefits of kati-uttanasana :
- Specially useful in slip disc, sciatica and back pain.
4) Makarasana (Crocodile Pose)
Makara means Crocodile and Asana means Pose. The posture of the crocodile lying in the river in a calm state is called Makarasana. While practicing this asana, one has to lie down on the ground in a very calm posture in the shape of a crocodile. It is an asana in which breathing is done by keeping the eyes closed, due to which it keeps the body and mind absolutely calm and removes depression, restlessness, confusion, migraine and disorders related to the brain. This asana acts as a medicine for people troubled by headache. This asana is also very beneficial in removing the problem of back pain in women.
Process of Makarasana :
- Lying on the abdomen, join the elbows of the hands and make a stand and raise the chest by placing the palms under the chin. Keep the legs straight from the knees to the toes, now while inhaling, bend the legs first one each and later both the legs together, while turning, the heels of the feet touch the buttocks, while exhaling, straighten the legs. It is called ‘Makarasan’. Do 10-12 repetitions like this.

Benefits of Makarasana :
- It is a very beneficial exercise for slip disc (moving of the spine), cervical spondylitis (pain in the neck and its back) and sciatica (hip pain).
- It is especially effective for asthma (asthma and any lung-related disorder) and knee pain and makes the legs shapely.
5) Bhujangasana (Cobra Pose)
Bhujangasana is the 8th of the 12 asanas of Surya Namaskar. Bhujangasana is also known as Sarpasana, Cobra Asana or Snake Pose. In this posture the body forms the shape of a snake. This asana is done by lying on the ground and bending the back. While the head is in the position of the raised hood of the snake.
Process of Bhujangasana :
- Lying on the abdomen, keeping the palms of the hands on the ground, keeping the hands on either side of the chest, the elbows should be raised and the arms should be close to the chest. Keeping the legs straight, keep the claws together and pull them backwards. Breathe in and slowly raise the chest and head. Keep the lower part of the navel on the ground, bend the head and neck backward as much as possible; Stay in this position for about 30 seconds, then slowly come back to the starting position. This whole process is called ‘Bhujangasana (first)’. Repeat this action 3 to 5 times.

Benefits of Bhujangasana :
- Strength and flexibility of the spine can be increased.
- Improves metabolism and may help in weight loss.
- The lungs, shoulders, chest and lower abdomen can get a good stretch.
- Tension stays away. It can also be beneficial in depression.
- It can also help to open blockages of the veins of the lungs and heart.
- It can also provide relief in the disease of sciatica and asthma.
6) Shalabhasan (Locust Pose)
Practicing yoga regularly keeps the body healthy and can prevent major diseases. There are many postures of yoga, in which ‘Shalabhasana’ is a major asana. This asana strengthens the muscles of our body and problems like back pain can be overcome. Shalabhasana is a Sanskrit language word, which is made up of two words, in which the first word “shalabha” means “locust or insect” and the second word asana means “posture”, i.e. Shalabhasana means posture like grasshopper. Happen. This posture is called “Grasshopper Pose” in English. This strengthens your spine. It comes under the category of Hatha Yoga. This mudra may be easy to see, but you may find some difficulty in doing it.
Process of Shalabhasan :
- Lie on your abdomen and place both hands under the thighs, the chin will remain on the ground. Breathe in and lift the right leg up without bending the knee and stay in this position for 10 to 30 seconds. Coming back to normal position, do the exercise again with the left leg. In this way do 5 to 7 repetitions.
- Now join both the legs together, without bending the knees, keep the palms facing upwards or downwards as per your convenience, (all the fingers will be together) now rise upwards, in this the part from the navel to the bottom will rise. This exercise is called ‘Shalabhasan’.

Benefits of Shalabhasan :
- Removes all diseases occurring in the lower part of the spine. It is especially beneficial in back pain and sciatica pain. Lungs become strong, constipation breaks.
Shalabhasan-2
Process :
- Lying on the abdomen, keep the right hand touching the ear and head, and keeping the left hand behind the waist, while inhaling, lift the head and right hand from the front and the left leg from the back, above the ground, for a while. After stopping in the position, come back slowly, in the same way do this asana from the left side. This posture is called ‘Shalabhasana-2’.
Shalabhasan-3
Process :
- Lying on the abdomen, keeping both the hands behind the back and keeping them straight, hold the wrists of each other hand, while inhaling, raise the head and chest as much as possible (keep the hands pulled from behind), the vision will be fixed towards the sky. This process is called ‘Shalabhasana-3’.
7) Ustrasana (Camel Pose)
In Ustrasana, the body forms the shape of a camel. This posture is also called Camel Pose in English. Like a camel can live easily even in the difficult conditions of the desert, if this asana is practiced regularly, it helps in giving a healthy life by removing every physical and mental problem from the body.
Process of Ustrasana :
- Sit in the position of Vajrasana.
- Now erect the ankles and place both hands on them. Keep the hands in such a way that the fingers are on the inside and the thumb is on the outside.
- Breathe in and lift the waist up while turning the head and neck back. Exhale and sit on the heels. Do three to four repetitions like this.

Benefits of Ustrasana :
- This asana is very beneficial for the respiratory system. Activates the lung cell, which benefits asthmatic patients.
- It cures all spinal diseases like cervical spondylitis and sciatica.
- Beneficial for thyroid.
8) Ardha Chandrasana (Half Moon Pose)
Ardha Chandrasana is a very important posture of Hatha Yoga. In this yoga asana, the body comes in the shape of half the phase of the moon. The purpose of Ardha Chandrasana is to balance the energy that creates balance between the body and the mind. While doing this asana, the body is balance only between the feet and the hands. It gives amazing balance and strength to the body. This asana is design for the yogis of medium or intermediate level. Ardha Chandrasana is also called Half Moon Pose in English language. It is advisable to practice Ardha Chandrasana for 30 to 60 seconds. This exercise can be repeated once.
Process of Ardha Chandrasana :
- Get on your knees in the position of Ustrasana. Keep both the hands on the chest.
- By inhaling, while bending the neck and head backwards, stretch the waist upwards.
- When the head is tilted back and rests it on the ankles, then it is Purna Chandrasana.
.jpg)
Benefits of Ardha Chandrasana :
- Ardha Chandrasana strengthens the legs and feet.
- It gives strength to the ankles, hamstrings and calves.
- Ardha Chandrasana opens up the hips, chest and shoulders.
- Makes the chest and body firm and firm.
- Helps to bring the body in the right tone.
- Stretches the muscles of the neck, back and abdomen.
- It also helps in building 6 pack abs.
- Stimulates the digestive glands.
- Gives strength to pelvic muscles.
- Effectively deals with the problem of back pain.
- Reduces stiffness of neck, shoulders and knees.
9) Trikonasana (Triangle Pose)
While doing Trikonasana, the muscles of the body get stretch in three different angles. That is why this posture is called Trikonasana. Trikonasana is a very easy posture of the beginner level. This asana is consider to be the posture of Vinyasa style. The duration for doing this is stated to be 30 seconds. Repeating it can be done with one leg 3-5 times everyday. The ankles, thighs and knees become strong with the continuous practice of Trikonasana. This puts strain on the ankles, groin, thighs, shoulders, knees, hips, calves, hamstrings, thorax and ribs.
Process of Trikonasana :
- Stand straight keeping a gap of about one and a half feet between both the feet. Both the hands should be open parallel to the shoulders.
- While breathing in, take the left hand from the front, place it on the ground near the left paw or place the hand near the heel and lift the right hand upwards and look at the right hand while rotating the neck to the right. Then while exhaling, come to the former position and do the same exercise from the other side as well.
.jpg)
Benefits of Trikonasana :
- It strengthens the knees, ankles, feet, chest and hands.
- This asana stretches the groin, hips, hamstrings, calves, chest, spine and shoulders.
- It helps in increasing physical and mental stability.
- It improves digestion and stimulates the lower abdominal organs.
- It also helps in reducing back and sciatica pain.
- Trikonasana removes flat fit, osteoporosis, neck pain and impotence.
- It reduces stress and cures anxiety.
10) Padahastasana (Gorilla or Hand under Foot Pose)
Padahastasana is a Sanskrit word. Its literal meaning is the posture of touching the feet with the hands. There are some amazing benefits to the body by the practice of this asana. This asana not only heals your body but also gives new life. The head is below your heart during the practice of Padahastasana. Because of this, the flow of blood starts towards the head instead of in the legs. Due to this, a good amount of blood and oxygen starts reaching the brain. In addition, Padahastasana is a Hatha Yoga-style posture with moderate difficulty. The duration of doing this should be between 15 to 30 seconds. It does not require any repetition. The practice of Padahastasana stretches the hips, hamstrings, and calves while strengthening the knees and thighs.
Process of Padahastasana :
- Standing straight, while inhaling, raise your hands up and bend forward. Put your head on your knees. The hands will remain behind the calves.

Benefits of Padahastasana :
- Makes the waist and abdomen healthy.
- Very beneficial for height growth.
- This asana gives good stretch to the back, hips, calves and ankles.
- Calms the mind and gives relief from anxiety.
- Gives relief in headache and insomnia problem.
- Improves digestion by giving a good massage to the internal digestive organs of the abdomen.
- Activates kidney and liver.
- It also strengthens the thighs and knees.
- This asana cures high blood pressure, asthma, impotence, sinusitis and osteoporosis.
Recommended Articles :